
This is a practical, start-to-finish walkthrough of protecting a native C++ Windows application. We will decide what to protect, mark those functions in source, virtualize them, encrypt their strings, wrap the whole thing in the packer, and verify the result. The example uses C++, but the same steps apply to any native x86/x64 language the marker SDK supports.
Step 0: start from a working release build
Protect the binary you actually ship: a release build of your .exe (or .dll), 32-bit or 64-bit. Build it as you normally would, and (this matters for a smooth first run) keep the debug symbols (the PDB) from that build handy. They are never shipped, but they let the tool label your functions by name when you choose what to protect. Everything here also works without a PDB; it is just less readable.
Step 1: decide what to protect
You do not virtualize the whole program. Virtualized code runs slower, so you spend that budget where it counts. Pick the small set of functions whose secrecy actually protects your business:
- License validation and key handling
- The core of any proprietary algorithm
- Anti-tamper or integrity logic you have written yourself
- Anything that, if understood, lets someone bypass a paywall or clone your value
Leave hot loops and ordinary UI code native. A handful of well-chosen functions carries almost no user-visible cost while covering what matters.
Step 2: mark the functions in source (optional but recommended)
You can select functions later by hand, but the cleanest approach is to mark them where they are defined, using the marker SDK. Include the header and bracket each sensitive function's body with RabbitStart() and RabbitEnd():
#include "dhaedalida.h"

bool verify_license(const KeyBlob& key) {
    RabbitStart();                     // begin protected region

    if (key.magic != EXPECTED_MAGIC) return false;
    if (!check_expiry(key))          return false;
    return derive_seat_token(key) != 0;

    RabbitEnd();                       // end protected region
}
The markers are harmless no-ops in a normal build, so your program compiles and runs exactly as before: they only tell the protector which whole functions to protect. Rebuild your release .exe after adding them.
Step 3: open the app and select your binary
Launch the Dhaedalida desktop app and select the .exe you just built. On the functions page, marked functions are detected automatically. With a PDB they show up by name, so you can confirm you are protecting verify_license and not something else.
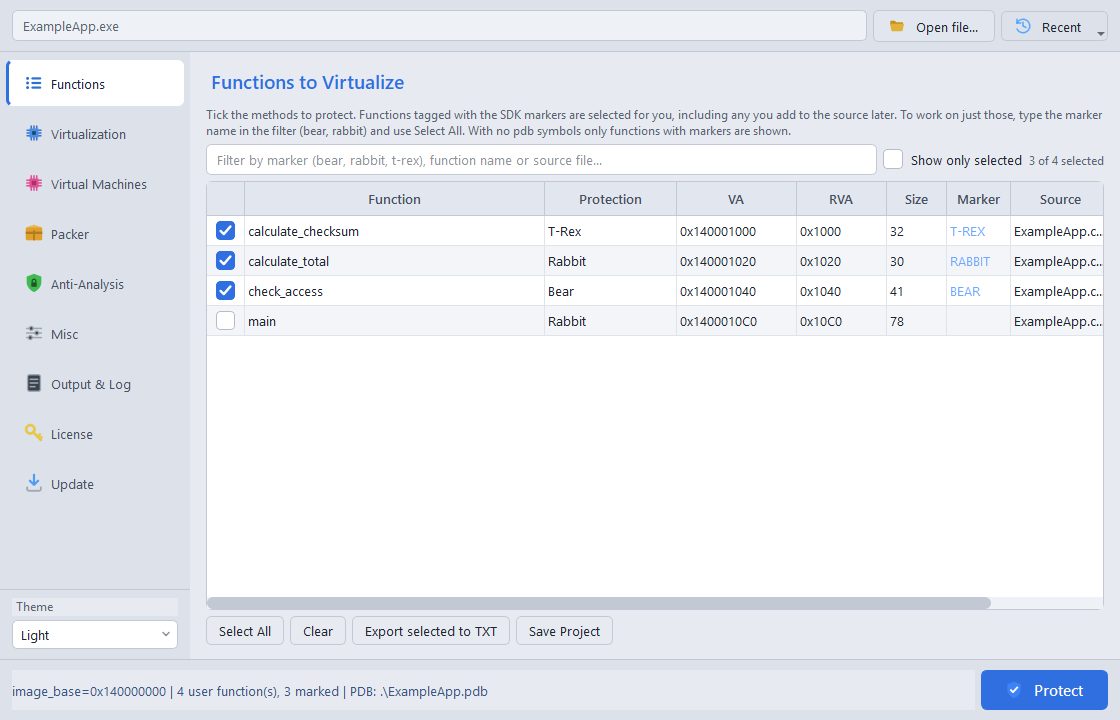
If you skipped the markers, tick the functions you want directly in this list instead.
Step 4: set virtualization options
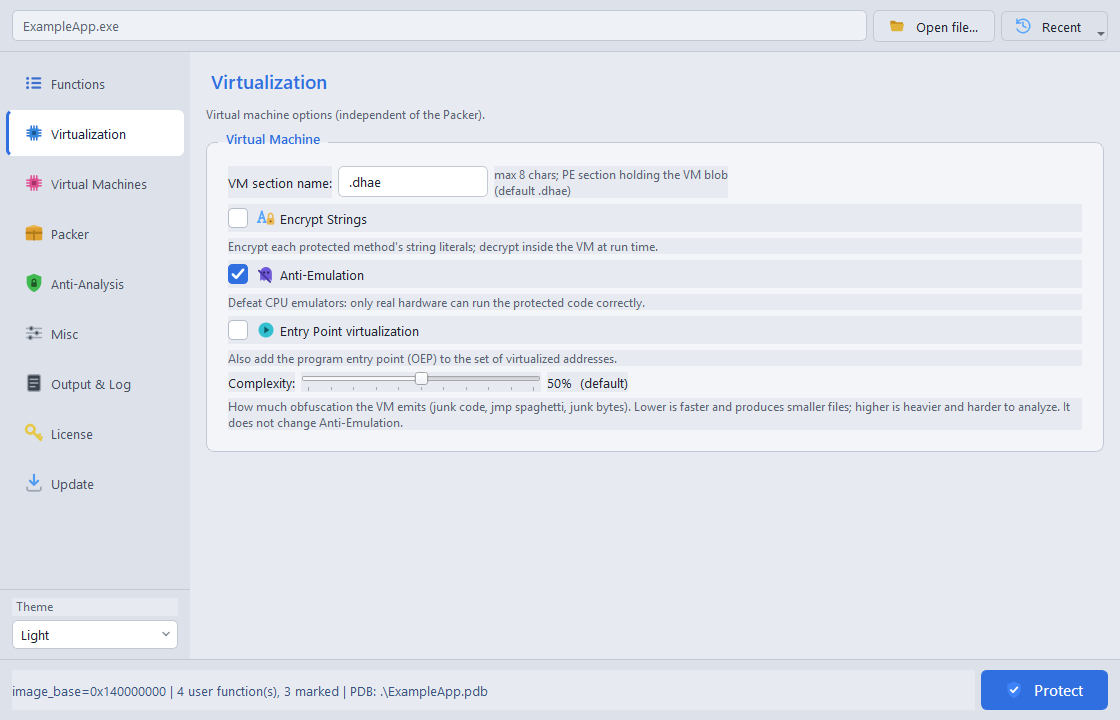
On the Functions page, confirm your selections and VM choices. On the Virtualization page, review the options and choose how heavy the protection should be. The complexity control adjusts applicable VM obfuscation, with potential size and runtime costs. It does not change T-Rex. Turn on string encryption here too, so the literals used by your protected functions (error messages, key names) are stored as ciphertext and decrypted only inside the VM at run time. This closes the strings leak that otherwise points straight at your check.
Step 5: enable the packer and runtime defenses (Pro)
Virtualization protects your chosen functions; the packer protects the whole file and hosts the runtime defenses. On the packer page, enable the packer, then add Protect Imports, Anti-Debug and Anti-Tamper, and Compress Boot. As covered in what a packer does, this is the outer shell over your virtualized core: the two layers protect different things and compose well.
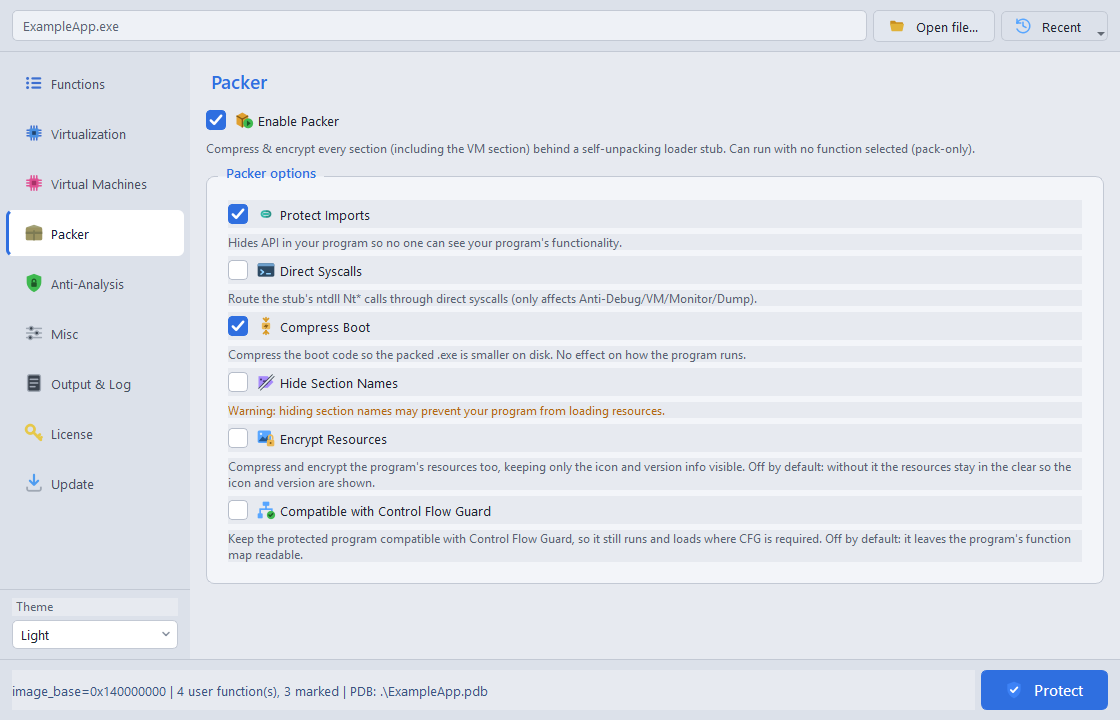
One caution: Anti-Dump is off by default because it can interfere with some GUI and resource-heavy applications. If you enable it, test thoroughly. The same goes for Anti-VM and Anti-Monitor: powerful, but they stop your program running inside virtual machines or alongside monitoring tools, which may or may not be appropriate for your product.
Step 6: protect, and check the result
Run the protection. The app writes a new, protected copy of your program and reports what it did. A successful run confirms the functions were virtualized and the packer applied.
Review the protection summary and log. Confirm that all requested functions were protected, then run your application tests on the output.
Step 7: automate it in your build (optional)
The GUI drives a command-line engine, dhaedalida-cli.exe, which you can call from a build script or CI. The synopsis is dhaedalida-cli <pe-file> [options], and you supply the function addresses (or a list file) plus the options you chose in the GUI:
# Virtualize one function, encrypt its strings, strip symbols, then pack
dhaedalida-cli app.exe --rabbit 0x140001060 --encrypt-strings --strip --packer ^
    --protect-imports --anti-debug --anti-tamper --compress-boot --out app.protected.exe
For many functions, keep the addresses in a text file and pass --rabbit-file funcs.txt. The engine returns 0 on success (and non-zero on a usage, license or processing error), so your pipeline can fail the build if protection did not apply. The full option list is in the CLI reference.
Step 8: verify like an attacker would
Finally, confirm the protection did what you expect, and always test the protected build on a clean target machine, especially after enabling anti-analysis layers:
- Run a strings scan on the protected
.exe. The literals from your protected functions should no longer appear in the clear. - Open it in a disassembler. Where
verify_licenseused to be, you should find generated VM machinery in place of the original comparison and branch. - Exercise the program. It must behave identically to the unprotected build: protection changes how the code is stored and run, never what it computes.
- Scan with your antivirus as part of release testing, and code-sign the protected binary after protecting it (see below).
A note on order of operations
Protect first, then code-sign. Signing a binary and then protecting it invalidates the signature, because protection rewrites the file. Make protection the last transformation before signing, and sign the final protected artifact. That keeps your Authenticode signature valid on exactly the bytes your users receive.
The takeaway
Protecting a C++ application is a short, repeatable process: choose the few functions that matter, mark them, virtualize them with string encryption, wrap the build in the packer with anti-debug and anti-tamper, and verify the result the way an attacker would. Do it in your build pipeline so every release ships protected, and sign last.
Current Dhaedalida engines: Rabbit, Bear, T-Rex and Wolf offer a choice of protection engines for individual functions. All four support native x86/x64 EXEs and DLLs in Basic, Pro and Ultimate; T-Rex requires AVX2; Wolf uses SSE2. Choose an engine per function and consult the current VM guide for scope and requirements.